Hello all! I know I have been on a little hiatus but I promise I am back! After doing so many challenges, I needed to take a mini break, as did my nails. (Plus a bunch of crazy family stuff has been going on...) Of course now that I am back, I plan to start a couple more challenges! I know, I know... I have an addiction to doing nail art challenges. I have the most fun doing them and though at times it can be frustrating, I really feel like I am improving on my skills! With that said, let me introduce to you the new challenge I am starting today. It's called the ABC Challenge and it's from one of the awesome groups I belong to on Facebook, called Llama Nails. If you are into nail challenges like I am, check out the group page here.
Normally the challenge posts will be every Wednesday but since this challenge actually started back in September, I have to catch up a little. I only found out about this group a few weeks ago and by then the challenge was well underway but it's never late to join right? Plus why not start from the beginning.
A is for Apples. When I think of the letter A, I generally think of apples. I don't know why but I do. I just bought a giant bag of Red Delicious apples from the store and thought that the dark red color would be perfect for my apples.
I used Sinful Colors Happy Ending as my base color and Orly's Grave Mistake for my apples. The rest was acrylic paint that I applied with a thin tipped nail art brush.
B is for Balloons. I'm not sure why I came up with balloons for B but I just love the way they came out! I am definitely going to do this design again, maybe for a birthday mani!
For my base color I used OPI Skull and Glossbones, then I used a fan brush and applied some white polish. For the balloons I used Sally Hansen Pacific Blue, SH Mellow Yellow and Ulta Non-stop Red. I created the balloons using a large dotting tool and a small one. I placed the small dots right at the base of the larger ones. I then outlined the dots and drew a small line for the tied part of the balloons.
I hope you enjoyed my post for today. Stay tuned for C and D!
Hello! It's HALLOWEEN! AHHHH! I am excited! I get to dress up at work, along with all of my co workers! It should be fun, the theme is Disney! Can you guess who I will be? I will be posting my costume nails tomorrow, along with me dressed in my costume! (Maybe if I get a good picture!) Anyways it's the last day of the "This is Halloween" Challenge! The objective was to recreate your favorite manicure done by someone else. I choose to recreate this adorable mummy gradient mani done by Amoki's Corner.
Aren't they just the cutest mummies ever?! I loved the way Amoki did her nails and what an amazing idea for the gradient challenge! I was very impressed and really loved her look, thus why I recreated it. :)
It wasn't that hard to do, I am actually rather impressed with myself on how clean my lines look. That was all done with my shaky hands people! WOO! I definitely have on my smug suspenders today.
What I used:
Base color: Sally Hansen White On
Gradient: SH White On, essence Irreplacable and Sally Hansen Golden-I
Black, white and red acrylic paint for the lines and eyes.
Nail art brushes and dotting tools
I wore these nails yesterday and had lots of compliments on them! This is definitely a look I will be doing again, I think they came out so cute! I'm said that October is basically over! It went by way to fast. I hope you all stick around to see more of my nail art. Thank you to my followers both new and old, I share my art for you! :) HAPPY HALLOWEEN!
Hello all! It's the last day of the Halloween Challenge since today is Halloween! I am so excited! I get to dress up for work and it's going to be a blast. I will make sure to post my costume manicure tomorrow so make sure to come back to see it! Anyways today's challenge was to recreate your favorite manicure from the challenge. I choose to recreate The Manicured Monkey's Bump in the Night nails. She made an adorable Frankenstein manicure and I couldn't help but love it! Mine varies a little but I hope you like it!
So like the Manicure Monkey, I did a Frankenstein face and then some stitching for the rest of the nails. She used two different greens but I decided to just use one. I think he came out so cute but I wasn't too happy with him so shiny so...
I threw a matte top coat over him! I think it is so much better! Sometimes matte is the way to go. What do you guys think?
Here's a comparison of the two top coats. The shiny normal top coat came be seen on the left and the dull matted top coat is on the right. Which do you like better?
What I used:
Base color: Sinful Colors Happy Ending
Black and white acrylic
Fine tipped nail art brush
Dotting tools
Warpaint Beauty Mattify (matte top coat)
I had just a blast with this challenge! My favorite nails that I did where my Monster nails from Things That Go Bump In the Night. I hope you all loved my manicures and my recreation of The Manicured Monkey's adorable Frankenstein nails. Hope you visit my blog again soon!
Hello! It's October! Not only is it the beginning of the best month of the year (Halloween is the best!), it's the last day of the 31 day challenge! I can't believe I did it...so many of us did it! WOO! It was stressful and frustrating at times but I had so much fun! I feel like I grew and definitely learned a lot from this experience. As a beginner nail artist, I have seen so much improvement in my skill and I have learned so many useful techniques! I can't wait to continue growing and continue working on making my blog better. I want to thank Rachel from Polished Criminails for making this all possible. It was such an amazing experience to belong to such a big challenge. I think this challenge is something I will partake in annually, it just seems like a cool thing to do. As for the objective of the last day, recreate your favorite manicure, I was thinking of redoing one of my creations from the challenge but it seemed like a better idea to recreate one of my favorite manicures from someone else who partook in the challenge. It was really hard to choose a favorite manicure, it really was. There were some really talent ladies that did this challenge with me. I went back through my favorite challenge days and finally just decided to choose a great manicure that I have been wanting to try forever. I choose to recreate Polish Groupie's Retro Wallpaper mani. I have seen this nail design around the web and have been dying to try it. I just love the colors Polish Groupie used.
I just love this design! I think the green Polish Groupie used was a better fit for a retro feel. I used essence Lime Up! as my basecoat. I also used my Kiss black and white stripers for the lines and then used Konad stamping polish to create the dots.
What do you guys think?
I still can't believe it! 31 Days of Nail Art! AH! I'm going to be working on a blog page to showcase the challenge. Here's a reminder of all the fun I had in September!
Don't forget I still have one challenge still going on! The Let's Do the Time Warp Challenge still has two posts left! And with October starting, I will probably be doing Halloween themed contests and challenges, so stay tuned.
Hello all! So today is the last day of the challenge for most people! I am still planning to do day 31, recreate your favorite challenge. We created 30 days of nail art using 30 different untried polishes! WOW! We did it! I'm pretty proud of all of us. Today's objective was to create a manicure inspired by a tutorial. There are a lot of great tutorials out there! I honestly had a problem choosing one. Ultimately, I decided to go with a tutorial I have been wanting to do for almost a year...Chalkboard Nails' Eyeball Pattern! I thought this was a great nail design the moment I saw it. It's a perfect design for Halloween, which is coming up soon! The untried polish for today is OPI Meet & Jingle. It's a really great red polish, especially for the holidays. I thought it would look cool as the background for the eyeballs.
What I used:
Base color: OPI Meet & Jingle
Eyeballs:
White stamping polish
OPI Too Hot Pink to Hold 'em
Sally Hansen Blue Me Away
OPI Mermaid's Tears
China Glaze Street Chic
Sinful Colors Black on Black
Various dotting tools
Spooky right?
It's not my best work due to the fact that I had to scramble together to get my nails done for posting but I really like how they came out and would love to do them again when I have more time.
See you tomorrow for the last post of the challenge! Erin
Hello all! Day 11 already! Wow, this month is really flying by! Yesterday was the last color segment of the challenge. Today starts segment two, patterns. The first pattern is polka dots. I absolutely love polka dots, but I personally suck at applying them. I have very shaky hands, so my dots really are ovals haha. Well this is what I came up with.
Hello! I have a love/ hate relationship with today's challenge color. I love yellow flowers (sunflowers being my favorite summer flower) but I hate wearing yellow, especially on my nails. I don't know why but I just hate it! Maybe it's because I am so pale. To make up for my hatred of the color, I have decided to do something really cute for today's mani!
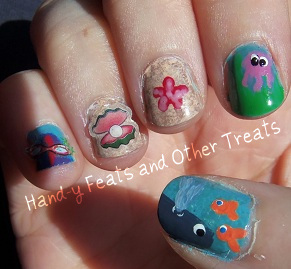
Hello! Today starts week 4 of the challenge! This week's theme is sea, sand and surf. The idea was to do either one category or a combo of categories to make a nail art design that would make anyone wish they were at the beach. I think I succeeded combining sea animals and sand.
It took some time to create this mani but overall I think it came out pretty good. I do love how my design came out, especially my thumbs. I was very unhappy with the way my right hand was photographing though! Apologies for that crappy work.
I could probably spend all afternoon telling you guys all that I did and what I used to create this nail art but instead I'll just list supplies and tell you a little bit about my techniques. The back grounds of my thumbs, middle fingers and ring fingers where sponged. I used two nail stickers for my right ring finger and right pinky. Everything else I painted by hand.
What I used:
CND Stickey base coat*
Piggy Polish Blue-ming Romance
Ulta Maine attraction
Orly Decades of Dsyfunction
China Glaze Street chic
L.A. Colors Art Deco Bright Green
Orly Bell of the ball
Ulta Encore pink
Claire's Beachy Keen
Acrylic paints: Whtie, peach, red, yellow, blue, black
Make up sponge for sponging
Dotting tool
Variety of nail art brushes
Nail stickers I got from Walmart years ago
Seche Vite fast drying top coat
*I just purchased CND Stickey base coat and this is the first mani were I have used it. I can already tell that this base coat and I are going to be friends. I sure hope so, my last one was awful. At first it was ok but it started peeling my nails and it was so tacky, applying polish was a nightmare. I have heard good things about CND Stickey and it's what Chalkboard Nails uses for her nails. I am curious if it's suppose to feel cool when you are applying it to nails, has anyone else experienced that with is?
So we are already four weeks into the challenge! I am having a lot of fun coming up with ideas. I hope you guys are enjoying them.
Next week should definitely be interesting. I've lived in Arizona since I was five and there's never been a shortage of scorching weather during the summer. Needless to say, I have inspiration for Hot hot hot!
Week 5: Feelin’ HOT HOT HOT--- It’s scorching outside. Show it on your nails!
Just a reminder: If you are interested in joining in the fun, you can! It's not too late! Everyone is welcome to participate and if you can't commit to every week, that's ok! I want to see what you guys can come up with. If you are interested contact me!
Hello! Today kicks off the first week of my summertime nail art challenge! This week's theme is the Olympics! Seemed appropriate since today is the start of the 2012 Summer Olympics that are taking place in London! I am very excited, I just love the Olympics.
This is the first time I have ever done Olympic themed nail art, so I wanted to keep it simple. So I have the Olympic rings, the flag of my country, a gold medal, a silver medal and the Olympic torch! I wanted to have all three medals...but I don't have any bronze colored nail polish! That's something I need to fix...
I realized now that I should have included something that represented London! My bad! I've never been to London, though I imagine it would be an amazing place to see. I have seen it on TV! Sherlock (the show) is based there and of what I've seen, seems like a cool place to be!
What I used:
Base color: OPI Alpine Snow
Sally Hansen Celeb City and Golden-I (for the medals)
Acrylic paints= white, black, red, blue, yellow
Variety of nail art brushes
Dotting tools
I hope you all are as excited as I am about the Olympics! I can't wait to watch the opening ceremony and all of my favorite events! Of course I am rooting for the USA but I want all the best athletes to win! GO TEAM!
I'm a little disappointed in the lack of response to my challenge but I did kinda just spring it on people. With that said, IT'S NEVER TO LATE TO JOIN! So join in the fun people!
I invited Adri from Morie's Nail Art to take part in this challenge, and she agreed! Take a look at her Olympic nails here.
I also invited The Little Canvas to participate. She won't be able to take part in all of the challenge due to scheduling but she's awesome and is still doing what she can. Check out her Olympic nails here.
Thank you to all those who are participating and to those that wanted to but couldn't because of scheduling! I appreciate it. :) Next week we'll be grilling it up! Here's a reminder of next week's objective:
Week 2: Grill it up!--- Eating outdoors is a big part of summertime. Grilling and having picnics are essential for a good summer. Create a design with food in mind.
Also if you are participating, let me know! You can comment below or email me at handyfeats@gmail.com I've only heard from a couple of people. I want to link your post and have you link my post! If you are participating but don't have a blog or anything, post your picture on my Facebook page. I really want to see what you guys have come up with!
Hello fine readers! Today's post is bond to belong. I never intend to write long posts, it just happens. It doesn't help that today's post is about my latest obsession; the book series/ TV show, A Song of Ice and Fire by George R.R. Martin, better known as Game of Thrones on HBO. I am currently enjoying the third installment of the book series, A Storm of Swords, and with the second season of the series just wrapping up, I wanted to do a nail art design in celebration of the awesomeness of the books and show.
If you have not seen the show nor read the books than I would like to warn you of SPOILERS! I'm going to explain my design and I would hate to ruin anything for anyone, so here is your warning.
The setting for my design is book 2/season 2. I wanted to do a nail art design for every "King" (despite my feelings for some of them *cough Joffery cough*) and I also wanted to represent most of my favorite characters. Sadly I had to leave out the onion knight, but I'm sure to do more designs later.
Hello! Today's post is about galaxy nails! I decided to try galaxy nails in honor of the 25th Anniversary of the television series, Star Trek The Next Generation. The cast is doing a tour for the anniversary and some of them made a stop at the Phoenix Comicon, so I was also to see the anniversary panel and a couple of the side ones with some of the cast. It was SO fun, I went to all four days of the event and I had the best time!
On to the nail art! The first picture below is actually of my second attempt at galaxy nails, which I wore for the last three days of the con, while the second picture is of my first and failed attempt, which I wore for the first day. Gosh do I hate how my first attempt came out.
Second attempt (success)
I really love how the colors blended in this second attempt. This post would be far to long if I explained everything I did, so I'll just summarize for you. I first painted all of my nails black (two coats) and then I sponged on the beginning of the nubulas with white. After that is where it gets complicated, basically I just sponged on a few more colors and then did a layer of glitter polish for stars and then a top coat. I found my inspiration for my nubulas from the tutorial that I found on Copythatcopycat. As for what I used, besides the usual- base coat, top coat, I used a makeup sponge and glitter polish.
First attempt (fail)
For my first attempt, I found my inspiration while watching this Cutepolish video. Cutepolish always has some cute tutorials and this one was good but I wasn't a big fan of how my big stars turned out. I also used two different glitter polishes, one with silver glitter and another with purple and blue glitter. It was glitter over kill in my opinion. If I had left out the ugly big white stars and the colored glitter, this design would have been cute. The only addition tool I used for this first design was dotting tools.
And as I mentioned, Phoenix Comicon was so much fun! I must thank my best friend Tara again for paying for my pass. Being unemployed is really crappy and depressing, so it's wonderful to have such a great support system. She supports me in many ways, like my nail polish addiction and my need to see all the Star Trek people. I couldn't ask for a better best friend.
My favorite part was sitting second row, near center, to the panel for Michael Dorn. Michael Dorn is the actor who played Lt. Worf on both TNG and Deep Space 9. I've always loved the character and after listening to Michael Dorn gush about aviation, I am completely smitten with him as well. My boyfriend might have to watch out haha ;) Here's a picture I took of Michael Dorn. He looks as if he is staring right at me! It was so cool and next to him in a picture of him in his Klingon makeup.
Michael Dorn/ Worf
Now that I have finished gushing about he very sexy Michael Dorn, I have some questions for y'all! Have you ever attempted galaxy nails? Did you like your outcome? What technique did you use? I was very happy with my second attempt at galaxy nails and I hope to do more in the future, possibly a tutorial as well. What is something you geek out about? I defintly geek out about a lot of things, like Worf haha. :) I also found a great video for all who are interested. It's the taping of the panel, the whole hour! If you like Michael Dorn, you will enjoy this!
Hello there! Today is a post I would like to dedicate to my boyfriend. Last week was our 1 year anniversary together. He has been very supportive of my blog and has given me many ideas for designs (this one included) so I just want to say thank you by doing a post about something he adores.
Blake LOVES South Park. He will go on and on about anything that has to do with South Park. He talks about Trey and Matt, the creators and Primus, which is the band who does the theme song. It's rather cute, so I listen but I have admit I use to hate the show. In fact I use to actively refuse to watch it because I thought it was immature and highly inappropriate. I've now watched almost every episode and I find myself wanting more... Once I gave this show the time of day, I realized how smart it is. Sure it has it's highly inappropriate moments and moments where I find myself saying "Oh god why?!" but Matt and Trey have found entertaining ways to poke fun at people. And I mean all people (no one is left out.)
I recently saw an episode where they made fun of forgetting to put down the toilet seat (and the harmful effects this action can have). They showed how both genders saw the task as simple, yet refused to do it themselves because it wasn't a big deal. A classic issue I have with Blake, haha. So event takes place that I will not name, as to not give any spoilers if you have not seen this episode, and the TSA gets involved. This TSA stands for Toilet Safety Administration rather than Transportation Security Administration, but goes into the issues that the Transportation Security Administration has brought into the public eye. I thought this was a clever and humorous way to illustrate real life controversy, which is why I now have to admit how much of a South Park fan I have become. With that said, here is my design-- South Park nails!
Kyle, Stan, Kenny, Butters and on the thumb, Cartman!
I am so happy with the way my nails came out! I wanted to use all of my favorite characters, which I was able to do. So on my left hand I have Kyle, Stan, Kenny and Cartman, who are the four main boys of the show. And on my pinky nail is Butters, who is just adorable! He is the most "innocent" character on the show, despite always getting grounded, "Oh hamburgers." haha.
Ike, Wendy, Randy, Mr. Garrison, and on the thumb, Mr. Mackey!
On my right hand is Ike; who is Kyle's brother, Wendy; who is Stan's love, Randy; who is Stan's dad, Mr. Garrison; who was originally the boys' teacher, and Mr. Mackey, the school counselor, "m'kay." This is the first time I used acrylic paint on my nails and I must say, it was much easier to work with than nail polish. So if you are planning to do characters on your nails, I recommend acrylic paint (over a base color, of course.) You can't really tell but I did use a base color on all of my nails, it's more visible on my right hand. I used essence You Belong to Me and acrylic paint I got at Michaels.
I hope you enjoyed my post! If you have never seen South Park, I recommend you do so (as long as you have a crude sense of humor haha.) It's definitely not a show for everyone. You can find episodes on Netflix or on the South Park Studios website!
Hello all! As the title indicates, I'm feeling fishy today! Haha. I was mulling over what to do for my nails and after a long thinking process (and inspiration found on Pinterest), I went with fish! I think they came out really cute and I have come up with more fishy ideas for the future, so stay tuned for that. Here are the fishes that I came up with for today.
Left hand
With my lack of a lighter, more water-esque blue, I went with essence Let's get lost, which is a blueish teal with a cream finish. I think it works. What color polish would you use for water? For the fish I went with essence Lime up! and Sally Hansen's Sun Kissed. Sun kissed was a PAIN to paint! Man, it was frustrating, that's why some of the fish have wonky tails haha. Speaking of frustrating...I have been searching for a light sky colored blue polish, does anyone have a recommendation? I've been looking into OPI's Cattiude but it's hard to find since the collection is older. It's pretty much been impossible to find a sky blue, especially with a cream finish. Such a disappointment, so I am turning to you, my awesome readers for help. Where can I find a light blue color with a cream finish???!!!! Ahhh!! I would really love to find one.
Right hand
What I used:
Base coat: Essie Ridge filling base coat
Base color: essence Let's Get Lost
Fish: Lime green= essence Lime Up!
Orange= Sally Hansen Sun Kissed.
Eyes and bubbles: White and black nail polish, dotting tools
Top Coat: Seche Vite
Overall I was really happy with this manicure. I got this idea from The Nail Trail, who I think has some really cute designs. Check her out! I think the fish are so cute and they were pretty simple to created. I just painted a circle with the polish for the head and then a sideways V for the tails. I realized after I applied the top coat that I forgot fins but oh well! I think the next time I am in a fishy mood, I will add fins and scales, should be fun. I hope you all enjoyed my post for today.


 Erin