Tuesday, March 20, 2012

Adventures Haul

Hello! I have some awesome things to share with you! So over the weekend, the best friend and I went on one of our routine adventures. Though these adventures are not always planned, I classify them as routine because we just love to go on them and practically every time we hang out an adventure takes place. It's just our thing. Anyways, this particular adventure took us to the mall. We walked into a store, that appeared to be Claire's (but was actually Icing) in hopes of finding mood changing nail polish and oh boy did we find it. Did I end up buying any? Nope! Instead we stumbled upon magnetic nail polish. I was so thrilled to see that it was only $9. $9! For those who don't know anything about magnetic nail polish, it's really neat but very very expensive. I first heard about magnetic polishes a few months back, so I researched online and the average price for this stuff was like $15! So my dreams of ever owning one seemed very slim...until Icing. Not only was this one 9 bucks, it was buy 1 get 1 half off! So I ended up getting two for less than a bottle I could have bought at Ulta. I totally feel like I scored!

Then the two of us came across Claire's and decided to venture on in. We were looking for more magnetic polish. I am interested in buying a green color but the other store didn't have it,  thus why we decided to look in Claire's. No luck there either but we found the coolest looking nail polish! It's layered polish with a whole bunch of wacky colors...right up my alley, and being the greatest best friend ever, who completely supports my nail polish obsession, she bought me two of them. So now to share them with you. I hope you can clearly tell that I am very excited about these polishes. I think they are so fun and I hope you like them as much as I do.


So this is what they look like. I just love adding nail polish to my slowly growing collection. I decided to finally count how many polishes I own and it's now up to 80 (not included stamping polishes, stripers, or fun top coats.) I had no idea it had gotten that high! Wow! Well I hope to get plenty more, I just love my nail polish.

Polishes have no names.
I was just so darn excited to get my hands on some magnetic nail polish and I can't wait to use one of these. It's going to be hard to decided which one to use first since they are both just pretty colors. The camera didn't do a great job of capturing the color of the one of the left. The one of the left is a blue iridescent shade, a very delicate and pretty color. It just comes off blue here but there is a purple iridescent color in there. The one on the right is a purple-ish grey, that is just so classy. Sadly, these babies have no names, which was kind of a bummer but Tara named the purple/grey one Plumpernickel. If you have any ideas on what to name the blue one that would be awesome! I am open to any and all suggestions. I love the word iridescent and it really does fit in with the description of the polish, so I'm thinking the name should use that word somehow. hmm..


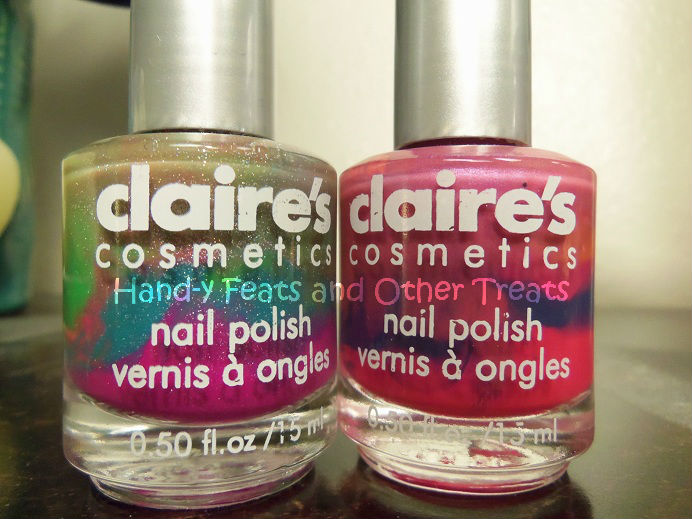
And on to the layered polishes. I was so sad because the bottles warn you not to shake them but in transit some shaking occurred. So in the picture you can see that there has been some blending but still, these two are just gorgeous. Now unlike the magnetic polishes picture, this pictures perfectly shows what colors these beauties are. They are so bright and vibrant and I just adore their names. The one on the left is called Technopop and this was Tara's favorite. It's sparkly (there is glitter in the polish) and just outrageously fun. The one of the right is called Beachy Keen, which I think is very fitting since those colors do remind me of a sunset at a beach. This one didn't have glitter but when painted on, it has a matte finish. I found this surprising but awesome since I like the matte look. And before I forget, let me tell you that even though they look awesome in the bottles, when painted on the colors blend. What I find cool about this is, that no one nail comes out painted like another. So these polishes make every nail color unique, which I find to be fun. I have already done a new mani using technopop but that will be for another post, which I will try to get out to you tomorrow. I hope you have enjoyed, even though I was long winded haha. Please feel free to comment and click a reaction!


Until next time,
Erin

Saturday, March 17, 2012

Happy St. Patrick's Day!

Hello again, post two for the day! First off, I have to tell you how much I just loved this manicure. I wore it all this week and had planned to wear it for today but sadly some of the polish on a couple of my nails started to chip. I hate when polish does that, but hey what can you do when you use your hands a lot... This post is dedicated to my bestest best friend Tara and my loving and devoted boyfriend Blake. These two love and support me to the fullest extent of their capabilities and for that I am truly grateful. I couldn't feel more loved. These two provided me with the idea for this manicure and I think it came out so wonderfully.

Indoors
 It's a leprechaun looming over his beloved pot of gold and of course this pot of gold has a rainbow attached to it. I did most of this design freehand, with the exception of my pinky being a stamp. (Which is hardly visible, thus I am not going to mention it.) This was my first attempt at doing freehand rainbows...They are much harder than they look haha. I feel that mine came out a bit sloppy but decent for a first attempt.

Sunlight
What I used:
Base coat: Essie Ridge filling base coat
Base color: Essie Pretty Edgy
Color of rainbow: Orly Belle of the Ball, Sally Hansen Sun Kissed, Mellow Yellow, and Sally Hansen Blue Me Away
Leprechaun: Face color was a blend of Sally Hansen Sun kissed and white stamping polish, along with a dot of mellow yellow. Hair was Sally Hansen Sun Kissed, eyes were black and white stamping polishes. 
Other colors used: Sinful colors Black on Black, Sally Hansen Golden-I
Top coat: Seche Vite
Dotting tools and various nail art brushes were also used. 

Here is the gif my boyfriend made for me. It's so cute. See what happened was after I made the Leprechauns with their hats, I noticed that if I flipped him over his hair looked like a beard and his hat became a suit. The bestie and I were so amused by this, probably because I was being such a dork and repeating hat suit hat suit as I rotated my thumb. But ya...haha I just had to share it with you. This leprechaun is multi-talented! 


I hope you enjoyed my post for the day. Please click a reaction box on the bottom of this post! It will really help me to improve. I hope you all have a wonderful day filled with green things. And by the way, the corn beef and cabbage I made turned out amazing.

Until next time,
Erin 

Luck of the Irish

Happy St. Patty's day all! Today is one of my favorite holidays! I just love wearing green and being festive. I also love corn beef and cabbage, which I plan on making later today. Yum. For any interested, I will be using this recipe. I'll let you know how it turns out but on to business. Naturally, I have a green manicure for you today. I have another St Patrick's day theme manicure that I want to share with you but I need the boyfriend to help me with some editing first and right now he's sprawled out across the bed. Here is what I am wearing today.


 I was going through my stamping plates and found a pattern that looked like clovers to me, so I decided to use it today. Clovers are one of the first things I think of when I think of St. Patty's day. Four leaf clovers are thought to bring good luck. Well now I have a bunch of them covering my digits. Boy, do I need the luck. Job hunting has not been very successful. *sigh* Perhaps this manicure will help.

What I used:
Base coat: Essie ridge filling base coat
Base color: Essie pretty edgy
Stamping colors: Konad white stamping polish and OPI Mermaids tears
Stamp: BM 214
Top coat: Seche vite

I like to use multiple colors when I am stamping from time to time. All you have to do is scatter dots of each color of the image you want to use and then when you scrape it, the colors will blend. Sadly this stamp came out blotchy and not as clean as I would have hoped. It's small designs though, which I feel is to blame. Just out of curiosity, would anyone like me to do tutorials of how I use stamping plates?

What are you wearing on your hands today? Keep a look out for my other St Patty's post. I should be done with it later today. Oh! I also want to mention that I just added a new feature to the bottom of my posts. It's called reactions and I added it because I want to get an idea of how my readers feel about my blogging. So I need everyone's help. If you read a post of mine, can you please tell me your reaction? I want to improve so please be completely honest! I have selected four words that I think are possible reactions to my blog. If you feel that I should use other words let me know. PLEASE, click a reaction! Thanks :) Also leave comments, I love comments. Have a fun day today and don't forget to wear green!


Until next time,
Erin

Tuesday, March 13, 2012

Long belated Valentine's post

Hello there! So I have been without internet for an entire month. HOW DREADFUL! Something is terribly wrong with my computer and it just won't connect to the internet...except today (just for the heck of it I turned it on) and to my utmost delight, there it was, the little symbol of glory...the orb of the earth, indicating a connection. Just a glorious sight. So hopefully I will be able to stay connected, if not I won't be M.I.A for that long again. I will just have to use my boyfriends computer despite my hatred of it.

I have some happy news. I was out to lunch today and the waitress complimented my nails and asked me if they were press ons! I was so giddy, since to me this compliment meant that my nails must have looked good enough to be mistaken for professional work, go me! Haha just the little ego boost I needed for the day.

Last time I posted it was the day before Valentine's Day and unfortunately I was unable to post my adorable Valentine manicures, so this post will include those designs since they are just to cute not to. I plan to play catch-up for you guys.

Love Birds
The first manicure I want to share with you is the one I actually wore on Vday. Love has many meanings and can be seen in many ways. And one of my favorite ways to see love is when two people are madly in love with each other. I like to think of these people as love birds, so with that said, here is my manicure inspired by love birds.


What I used:
Base coat: Essie ridge filling base coat
Base colors: 1 coat of Lucky luck lavender by OPI, 1 coat  Julep Carrie, sponged on a layer of Sinful colors 24/7 and a sponged layer of white polish
Hearts and Stamp: Orly Belle of the Ball
Birds: China Glaze For Audrey, white and black polishes, dot of NYC 111 for the cheeks
Bow: Sally Hansen Sun kissed
Dotting tools and nail brushes used.
The stamp I used was BM 09.

I really loved how this came out, I'm definitely going to redo this one next year.

Owl You Need is Love
I had colored a few Valentines cards and among them was one that read "Owl you need is love." I thought that was the cutest pun and decided to make a design for it.


I first saw an Owl mani on letthemhavepolish and she had originally seen the tutorial from chalkboardnails and if you follow the last link, you can find the original source of the tutorial. I used the little hole puncher reinforcements as a way to do my "horns" of the owls. I also read some where...cannot for the life of me remember where, that you can also use these reinforcers to make the half moon design. If you don't know what a half moon design is or what it looks like click here.

What I used:
For all nails---
Base coat: Essie Ridge filling base coat
Top coat: Seche Vite
Dotting tools
For Owls---
Base color: Ulta Plum Perfect
Eyes: Black and white strippers
Beak: Sally Hansen Sun Kissed
Feathers: essence a lovely secret
For Other nails---
Base color: essence a lovely secret
Polka hearts: Ulta Plum Perfect

This time when I did the polka hearts I used the method described in the post here. It was so much easier and I think (for the most part) the hearts came out a lot better than in my previous polka heart post. Have you tried this polka heart technique yet? Do you want to?

I was very happy with how both of these designs came out, I'm just so sad that it took a whole month to share them with you. I hope you all enjoyed them. I have new posts in the works, so more are on the way!

Until next time!
Erin
Related Posts Plugin for WordPress, Blogger...