Hello there! So I have been without internet for an entire month. HOW DREADFUL! Something is terribly wrong with my computer and it just won't connect to the internet...except today (just for the heck of it I turned it on) and to my utmost delight, there it was, the little symbol of glory...the orb of the earth, indicating a connection. Just a glorious sight. So hopefully I will be able to stay connected, if not I won't be M.I.A for that long again. I will just have to use my boyfriends computer despite my hatred of it.
I have some happy news. I was out to lunch today and the waitress complimented my nails and asked me if they were press ons! I was so giddy, since to me this compliment meant that my nails must have looked good enough to be mistaken for professional work, go me! Haha just the little ego boost I needed for the day.
Last time I posted it was the day before Valentine's Day and unfortunately I was unable to post my adorable Valentine manicures, so this post will include those designs since they are just to cute not to. I plan to play catch-up for you guys.
Love Birds
The first manicure I want to share with you is the one I actually wore on Vday. Love has many meanings and can be seen in many ways. And one of my favorite ways to see love is when two people are madly in love with each other. I like to think of these people as love birds, so with that said, here is my manicure inspired by love birds.
What I used:
Base coat: Essie ridge filling base coat
Base colors: 1 coat of Lucky luck lavender by OPI, 1 coat Julep Carrie, sponged on a layer of Sinful colors 24/7 and a sponged layer of white polish
Hearts and Stamp: Orly Belle of the Ball
Birds: China Glaze For Audrey, white and black polishes, dot of NYC 111 for the cheeks
Bow: Sally Hansen Sun kissed
Dotting tools and nail brushes used.
The stamp I used was BM 09.
I really loved how this came out, I'm definitely going to redo this one next year.
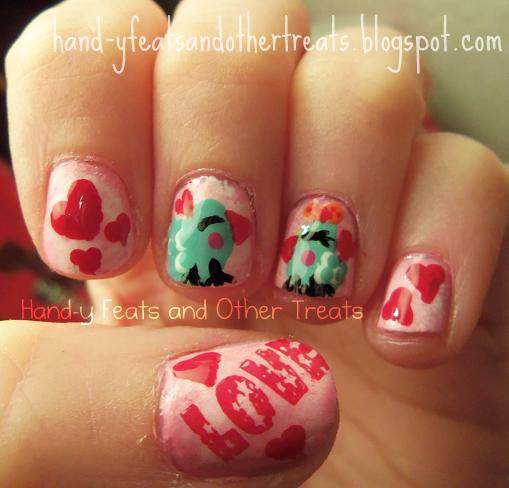
Owl You Need is Love
I had colored a few Valentines cards and among them was one that read "Owl you need is love." I thought that was the cutest pun and decided to make a design for it.
I first saw an Owl mani on letthemhavepolish and she had originally seen the tutorial from chalkboardnails and if you follow the last link, you can find the original source of the tutorial. I used the little hole puncher reinforcements as a way to do my "horns" of the owls. I also read some where...cannot for the life of me remember where, that you can also use these reinforcers to make the half moon design. If you don't know what a half moon design is or what it looks like click here.
What I used:
For all nails---
Base coat: Essie Ridge filling base coat
Top coat: Seche Vite
Dotting tools
For Owls---
Base color: Ulta Plum Perfect
Eyes: Black and white strippers
Beak: Sally Hansen Sun Kissed
Feathers: essence a lovely secret
For Other nails---
Base color: essence a lovely secret
Polka hearts: Ulta Plum Perfect
This time when I did the polka hearts I used the method described in the post here. It was so much easier and I think (for the most part) the hearts came out a lot better than in my previous polka heart post. Have you tried this polka heart technique yet? Do you want to?
I was very happy with how both of these designs came out, I'm just so sad that it took a whole month to share them with you. I hope you all enjoyed them. I have new posts in the works, so more are on the way!
Until next time!
☮Erin
A blog about nail art, life, and the other treats that are found along the way.
Showing posts with label Love. Show all posts
Tuesday, March 13, 2012
Monday, February 13, 2012
Roses are red.
Hello! Happy Valentines Day, I meant to post this earlier but was preoccupied... So I was a little stuck on coming up with another love themed design and I was checking out Cutepolish, who always has just the cutest videos and I came along her Vintage rose design and thought "wow, this is perfect" since roses are one of my favorite flowers and they pretty much go hand in hand with Valentines day.
Apologies for the quality of the photos. For some odd reason, the colors really didn't want to capture right on the camera. Mostly the roses themselves just wouldn't show up. Make sure to watch the video by Cutepolish if you would like to recreate this design, I couldn't do a better job of explaining how to do it haha. Here is the link to the video again.
What I used:
Base coat: Essie ridge filling base coat
Base color: China Glaze For Audrey
Inside of rose: OPI Rodeo Rose
Outside: Orly Belle of the Ball
Leaves: Art Deco Really Green
Top coat: Seche vite
What is your favorite kind of flowers? Besides red roses, which are the best color of roses? I think I might attempt this design again but with a much lighter pink for the inside of the rose, so it would show up better. I also love pink and yellow roses, they are so pretty so I'm thinking I might make this design over but use those colors. :)
Until next time,
☮Erin
First attempt at polka hearts
Hello! So my next love inspired manicure is polka-heart accent nails. I got the idea of a polka heart from Rebecca, who is the talented author of the blog rebecca likes nails. When I saw the post about the hearts a few months ago, I just fell in love. Oh adorable! Bad news was, my first attempt at this cute idea failed...miserably. My hearts just ended up looking so sad, good thing I only did accent nails haha.
All you will need for this post is a base color of your choosing, as many colors as you want for hearts (I just used one) and a dotting tool to make the hearts. As I mentioned before, I really failed at attempting to make polka hearts, I think my method was all wrong. I did two dots and then "pulled" down polish to connect at the bottom to make the heart. That's probably how they ended up looking so sad and pathetic haha.
What I used:
And before I forget to mention it, Rebecca updated the original post just the other day and it has a great tutorial along with it. So check it out here. Do you think you might try the polka heart idea? I'm looking forward to trying this design again soon. Hope you all enjoyed my post!
| Left hand |
What I used:
Base coat: Essie ridge filling base coat
Base color: OPI Rodeo Rose
Polka-hearts: Kiss white striper polish
Top coat: Seche Vite
| Right hand |
Until next time,
☮Erin
Friday, February 10, 2012
He loves me...
Hello everyone! So sorry that I have neglected to post lately. Sadly my mother has been in and out (and back in) the hospital and I have been rather upset and stressed lately. BUT not posting has been making me more sad, so here is a quickly done post for you all.
It is now February the month of love, so it's safe to say that all manicures done for this month will have a love theme. I don't even like to celebrate Valentines day since I find it to be just a sad, miserable holiday. Most of the time I am single on Valentines, so February 14th has always been a reminder that I am alone, and that is just a crappy feeling! However, I am an advocate for love. Love has many sides to it and in my opinion, it is the best thing in the world.
My first experience with love, besides the love of my family, would be the time I experienced my first crush. Of course I played the silly, "he loves me, he loves me not" game with any kind of flower I could find in the fields at recess, so I decided that would be a cute idea for a nail art design.
For those unaware of the game, "He loves me, he loves me not," is a game you play when you are in love with someone (or have a crush) and want a silly way to find out if the person feels the same way about you. Find a flower with multiple petals and one by one pull the petal off of the flower going back and forth between the person your fancy, loving you or not. So for example, as you pull of the first petal you would say "he loves me," then the next petal, "he loves me not" and so on and so forth. The final petal will reveal your loves true intentions haha. It's very silly but it's fun.
| Right hand |
| Left hand |
Base coat: Essie ridge filling base coat
Base color: Essence You Belong to Me
Stem and leaves: Art Deco Bright Green
Petals: Ulta Plum Perfect (with a little white mixed in)
Pollen (or middle of flower): Sally Hansen Mellow Yellow
Essence You Belong to Me is becoming one of my favorite polishes and it was only 99cents at Ulta! Definitely need to go get more of it. I hope you enjoyed my post! More love themed nails are on the way!
Until next time,
☮Erin
Subscribe to:
Posts (Atom)