Friday, July 27, 2012

2012 Summertime Challenge! Week 1: Olympics

Hello! Today kicks off the first week of my summertime nail art challenge! This week's theme is the Olympics! Seemed appropriate since today is the start of the 2012 Summer Olympics that are taking place in London! I am very excited, I just love the Olympics. 


This is the first time I have ever done Olympic themed nail art, so I wanted to keep it simple. So I have the Olympic rings, the flag of my country, a gold medal, a silver medal and the Olympic torch! I wanted to have all three medals...but I don't have any bronze colored nail polish! That's something I need to fix...

 I realized now that I should have included something that represented London! My bad! I've never been to London, though I imagine it would be an amazing place to see. I have seen it on TV! Sherlock (the show) is based there and of what I've seen, seems like a cool place to be! 


What I used:
  •  Base color: OPI Alpine Snow
  • Sally Hansen Celeb City and Golden-I (for the medals) 
  • Acrylic paints= white, black, red, blue, yellow
  • Variety of nail art brushes
  • Dotting tools
I hope you all are as excited as I am about the Olympics! I can't wait to watch the opening ceremony and all of my favorite events! Of course I am rooting for the USA but I want all the best athletes to win! GO TEAM!


I'm a little disappointed in the lack of response to my challenge but I did kinda just spring it on people. With that said, IT'S NEVER TO LATE TO JOIN! So join in the fun people! 


I invited Adri from Morie's Nail Art to take part in this challenge, and she agreed! Take a look at her Olympic nails here.

I also invited The Little Canvas to participate. She won't be able to take part in all of the challenge due to scheduling but she's awesome and is still doing what she can. Check out her Olympic nails here.

Thank you to all those who are participating and to those that wanted to but couldn't because of scheduling! I appreciate it. :) Next week we'll be grilling it up! Here's a reminder of next week's objective:

Week 2: Grill it up!--- Eating outdoors is a big part of summertime. Grilling and having picnics are essential for a good summer. Create a design with food in mind. 

Also if you are participating, let me know! You can comment below or email me at handyfeats@gmail.com  I've only heard from a couple of people.  I want to link your post and have you link my post! If you are participating but don't have a blog or anything, post your picture on my Facebook page. I really want to see what you guys have come up with!

Until next time,
PeaceErin

Monday, July 23, 2012

2012 Summertime Challenge, who wants in?

Hello all! As we all know, it's summertime and boy is it hot! To celebrate summertime, I have decided to create a fun summer-themed manicure challenge.

I've been wanting to create my own challenge ever since last year’s 31 day challenge. However, I can’t see myself committing to a daily challenge, so I wanted to create my own challenge with different guidelines. So here it is:

Click on me to make be bigger!
This challenge will last for 9 weeks, starting this Friday, July 27th and ending on Friday September 21st. (Google says this is the last day of summer.) The goal of the challenge is to post at least once a week. I plan to post every Friday but feel free to post on whatever day is most convenient for you.

UPDATE: Since this Friday is the beginning of the challenge, Friday will begin the "week." For example, Olympic nails should be posted anytime from Friday July 27th until Thursday August 2nd! Week 2 will then begin on Friday August 3rd and so on. I hope that makes sense! Please contact me if you have any questions!

Breakdown of the Challenge:
Week 1: Olympics—The summer Olympics are starting soon! Let’s show our love for the Olympics and our countries!

Week 2: Grill it up!--- Eating outdoors is a big part of summertime. Grilling and having picnics are essential for a good summer. Create a design with food in mind.

Week 3: Inspired by a bathing suit--- Pick your favorite swim suit and create a design based on it. Make sure to include a photo of the suit!

Week 4: Sea, Sand and Surf--- Pick 1,2 or a combo of as many of the listed categories as you would like and create a manicure that will make you wish you were at the beach!

Week 5: Feelin’ HOT HOT HOT--- It’s scorching outside. Show it on your nails!

Week 6: Favorite summer snack--- What is something you love to eat during the summer? Think treats that cool you off or things only available during the summer months.

Week 7: Inspired by a movie that takes place during the summer--- Pick your favorite movie that has summer fun in it!

Week 8: Inspired by a summer song--- What song paints the picture of summertime to you? Be creative!

Week 9: Water you doing? Create a summer-themed water marble--- This can be anything that makes you think of summer; water, sand, bright colors, neon, etc.

I’m inviting anyone and everyone to join in! If you wish to participate, please let me know as soon as possible by leaving a comment below! ^You can also send me an email at handyfeats@gmail.com! I would like to link up our blogs so our readers can enjoy all of the participants designs!

If you don’t have a blog, no biggy! I would love for you to share your designs with me on my Facebook page.

I hope you join and I look forward to everyone’s creations!

Until next time,
PeaceErin

Sunday, July 22, 2012

Blueberry Cream Cheese Crescent Rolls

Hello all! I have a treat for you today! It’s been a while since I have posted a treat and this one is so simple and so scrumdiddlyumptious, that I just had to share it with you: Blueberry cream cheese crescent rolls!


Now I must admit, this is not my original recipe. I got it from my mother, who got it from a Kraft magazine. We altered the recipe a little, so if you are curious, I was able to find the original recipe here.
 
So let’s get started! All you will need is four ingredients. That’s right, four.


What you will need:
  • 2 packages of crescent rolls (I used Pillsbury but store brand is just as good.)
  • 1 8oz package of cream cheese (I recommend Philadelphia brand.)
  • 4 Tbsp. of sugar
  • 1 cup blueberries
Directions
Preheat oven to 375ºF. While the oven is preheating, combine cream cheese and sugar. I would let the cream cheese soften, so it’s easier to combine.


Carefully unroll the crescent roll dough. Make sure to keep two triangles together, so it makes a square of dough. Press the seem of the two triangles together, this is to prevent all your yummy filling from falling out.

Place a spoonful of the cream cheese mixture into each of the squares. I spread my cream cheese mixture out a bit but you don’t have to (my mother never does.)


Add blueberries. I usually just add as many as I like.


 Fold opposite corners into the center, covering the filling. Repeat with the remaining two corners.


Place in the oven and bake for about 11 to 13 minutes or until it’s perfectly brown. It only took me 12 minutes to get a nice golden brown.


This recipe yields 8 pastries.

This recipe is so versatile, you can use any berry. Not to long ago, my mother used blackberries and it came out divine. You could probably use a number of different things for the filling, like apples or peaches. Something I will have to experiment with. I hope you enjoy this recipe as much as I do!

Until next time,
PeaceErin

Friday, July 20, 2012

Disco Ball nails

Hello! I have yet another stamping design to show you today. I’m excited about today’s post, since this is one of those times when experimenting turns out great the first time around.


I was looking through my plates and as soon as I came across BM 21 I thought, “YES! Disco!” And when I think disco, I think disco ball! I absolutely love disco. The customs, the music, everything! One of my favorite musical groups of all time is the Bee Gees, who definitely have a disco style. Unfortunately, there only remains a Bee Gee and so this post is dedicated to him, Barry Gibb.

Usual lighting
During the duration of my polishing process, I had ‘You Should Be Dancing’ stuck in my head. I’ve loved the Bee Gees for as long as I can remember. In my opinion, they have the perfect combo of having a unique sound and being utterly corny! They also have amazing lyrics! Here's a video of the song:


I am very happy with the way this design came out. It was a pain to photograph though! This is probably the only time that I got flash to work and it payed off. You can really see the disco ball effect.

Flash
What I used:
  • Base coat: Essie ridge filling base coat
  • Base color: Sally Hansen Celeb City
  • Stamping color: Konad White, Princess
  • Stamp: BM 21
  • Top Coat: Seche Vite
By the way! I have a new computer, so editing and posting should be easier and therefore more frequent! I’m going to try to post at least once a week now. I change my nails once a week, so it makes sense to post a least once a week. I hope you enjoyed my post! I'm going to leave you with my favorite Bee Gees song, and a clip from the 10th Kingdom (which is one of my all time favorite movies.)

'How Deep is Your Love' is my favorite song by them. It just evokes so many emotions every time I hear it. I really love it! 


Here's a clip from the 10th Kingdom of the trolls singing the Bee Gees song, 'Night Fever.' Do enjoy, this is how I sing the song too!

Until next time,
PeaceErin

Thursday, July 19, 2012

Deck of Cards

Hello readers! I have another stamping design for you today. Today’s post is inspired by a deck of cards! An idea thought up by my lovely best friend, Tara. I had done this design on my toes and when my best friend saw it she said, “Aw how pretty, they remind me of cards.” This girl loves her cards, so I took her word for it and decided that would be a really cute idea for a manicure. So voilà!


For my deck of cards, I used a blue design and my accent nail is of the four different suits. I originally was going to make a couple of my nails actual cards but because my nails are so small, it was turning out to be an impossible task.


What I used:
  • Base coat: Essie Ridge filling base coat
  • Base colors: Ulta Bam-blue-zled, OPI Alpine Snow
  • Stamping colors: NYC Skin Tight Denim, Konad Black & Ulta Non-stop Red
  • Stamps: BM 21, BM 19
  • Top coat: Seche Vite

Above is a picture of my toes! This is the design that inspired today's mani! As for the design, I really like the way my right hand came out, my left hand didn't turn out as well. In fact I had to redo my left hand several times and then just got sick of it. Would you try a deck of cards mani? What would you do differently? I hope you enjoyed my post! 

Until next time,
PeaceErin

Wednesday, July 18, 2012

Parrot Nails

Hello all! I have an interesting design for you today. Initially, today’s post was going to be about the fan brush method but it ended up evolving into something completely different. I had purchased nail art brushes from Bundle Monster, a while back, which included a couple of fan brushes. I have never used this type of brush before and thought It would be fun to give it a try. So I used two colors and dipped the end of the brush into the polishes and applied to the nail with a couple of brush strokes. I wasn’t to happy with the brush because it decided to clump instead of remaining fanned out. Perhaps I should have used acrylic paints instead of polish but hey, that’s what experimenting is for.


After the polish dried, I realized the strokes looked like feathers, so I decided to add on my feather pattern from BM 214. I choose to use a red color for the stamp because I knew it would stand out more (the whole green and red are contrasting colors thing.) Plus when I think of parrots, I see the color red.

What I used:
  • Base coat: Essie ridge filling base coat
  • Base color: Clear Polish
  • Polishes used for fanning: essence Lime Up! and Color Club Age of Aquarius
  • Fan brush
  • Stamp: BM 214
  • Stamping polish: Ulta Non-stop Red
  • Top Coat: Seche Vite

gal_13

Have you tried the fan brush method? Would you? I plan to try this method once again but instead of using polish, I think I’m going to use acrylic paint. I hope you enjoyed my post.

Until next time,
PeaceErin

Wednesday, July 4, 2012

4th of July

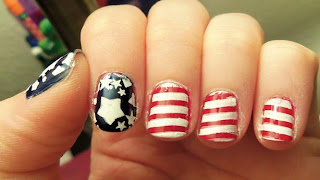
Hello my lovely readers! Happy 4th of July to those of you in the States! I am proud to be an American, so to show my patriotic spirit, I have two designs for you today. I decide to do two different ones, since Blake kept saying that the blue I used for the first design looked black and not blue. I swear the boy is color blind. I hope you all enjoy my post for today.


So here is the first design that I did. I love how it came out, expect for the big stars. I need to get a better star stamp. The blue polish I used is dark but the color on the flag is a navy blue and this was the darkest blue I had. In the sunlight you could see the blue highlights of the polish better but I was unable to take photos outside. 

What I used:
  • Base coat: Essie Ridge Filling Base Coat
  • Base color: essence Hard to Resist, Ulta Non-stop Red 
  • Stamps: BM 14, BM 20
  • Stamping color: Konad White, Princess 
  • Top coat: Seche Vite 

As for my second design, I used a lighter blue (which made Blake happier) and the little image of stars that I had. I also slanted some of the strips to try and create a rippling effect of a moving flag. I was a little disappointed in my stamping skills here, I think the stripes look a little bit sloppy. 

What I used:
  • Base coat: Essie Ridge Filling Base Coat
  • Base color: OPI Suzi says Feng Shui, Ulta Non-stop Red
  • Stamps: BM 14, BM 20
  • Stamping color: Konad white, Princess
  • Top coat: Seche Vite 

Have you tried patriotic nails? I used the flag as my inspiration, but where do you find inspiration for patriotic nails? I think next year I am going to try to do a water marble or something with fireworks. I'm very proud of where I live and who I am, and I plain to spend the night munching away of classic American fair. I hope you all have a lovely evening. Spend it with the ones you love! 

Until next time, 
Erin
Related Posts Plugin for WordPress, Blogger...