
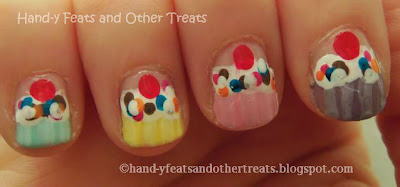
My nails came out cute, got many compliments on them, but I was not at all thrilled with the 'sprinkles' I made. I think next time I will try a different technique. This was a pretty simple design to achieve, thank you Rins for the inspirtation. What you will need:
- Dotting tools of varying sizes
- A small, thin paint brush
- Toothpick(s)
- 5 different nail polishes + white for the cupcake papers
- White polish for the "frosting" or brown if you want chocolate cupcakes
- Red polish for the cherry
- As many colors as you want for the sprinkles, I used 4 (brown, pink, blue and orange)
- And of course a base coat and top coat
Here's a run down of what I did: I started out painting about half of my nail the various polishes for the cupcake paper. Depending on how opaque the polish is after one coat, you may need to do two. Two coats is usually a safe bet. Once your nails are dry, add a few drops of the polish you used (depending on color you used for each finger) to a paper plate or surface that you are ok with getting polish on (I used a Halloween place mat lol), and mix a few drops of white polish with that color. For example, for my index finger I used OPI Planks a lot, so once my fingers were dry I mixed with purple with white and then used that mixture to paint lines onto the "darker" purple. This creates the lines for the cupcake paper. Do the same for the rest of your nails. I recommend doing both fingers for each color at the same time, since I mixed up enough polish for both fingers.
Next I used a paint brush to paint on the white for the frosting, simple enough. I used two coats. After that was completely dry, I got out my dotting tools. First I have a larger dotting tool and I dotted on the cherries to each nail. Then using smaller dotting tools and varying colors I dotted the sprinkles. Top coat and voila! Cute cupcakes! I felt the sprinkles were to big, so I think next time I will use a toothpick to dot them on or something.
 |
| Sunlight, right hand |
 |
| Sunlight, left hand |
All fingers:
- Base boat: Essie ridge filling base coat
- Base color: Ulta Pink-a-boo (two coats)
- Frosting: Kiss striper in White
- Cherry: Essie Really Red
- Sprinkles: China Glaze Street Chic, NYC Fuchsia Shock creme, Sally Hansen Blue me away and Sun kissed
- Top coat: Seche Vite
Index finger:
- OPI Planks a lot
Middle finger:
- Julep Carrie
Ring finger:
- Sally Hansen Mellow Yellow
Pinky finger:
- Essence You Belong to Me
Thumb:
- OPI Mermaids Tears

And of course, what are cupcake nails without actual cupcakes! I just love cupcakes :)


What kind of sweets do you like to have on your birthday? I love most sweets and have a weakness for chocolate, ice cream and cupcakes. What flavor of cake do you like? This year I was lazy and went with french vanilla cake by Betty Crocker, with fluffy white Duncan Hines frosting....and sprinkles! haha.

Happy Birthday to me! I would like to say thank you to my wonderful best friend Tara and my awesome boyfriend Blake, who made my birthday so very fun! Thanks guys!
I hope you all enjoyed my post for this evening, so sorry for it's lateness. Also I have questions. I have been working on watermarks and would love to get feedback from you lovely readers. So, do you like the watermarks in this post? I'm not sure if I should include either the url to the blog or the name of the blog OR should I include both like I did in most of the pictures above? Any feedback is much appreciated. My totally awesome boyfriend is also making me a logo for my blog, so stay tuned for that.
Until next time,
☮Erin
No comments:
Post a Comment
I would love to hear from my awesome readers! I value each and every comment, so leave me with your thoughts! Much appreciation and thanks! I will reply to all comments!