I have some happy news. I was out to lunch today and the waitress complimented my nails and asked me if they were press ons! I was so giddy, since to me this compliment meant that my nails must have looked good enough to be mistaken for professional work, go me! Haha just the little ego boost I needed for the day.
Last time I posted it was the day before Valentine's Day and unfortunately I was unable to post my adorable Valentine manicures, so this post will include those designs since they are just to cute not to. I plan to play catch-up for you guys.
Love Birds
The first manicure I want to share with you is the one I actually wore on Vday. Love has many meanings and can be seen in many ways. And one of my favorite ways to see love is when two people are madly in love with each other. I like to think of these people as love birds, so with that said, here is my manicure inspired by love birds.
What I used:
Base coat: Essie ridge filling base coat
Base colors: 1 coat of Lucky luck lavender by OPI, 1 coat Julep Carrie, sponged on a layer of Sinful colors 24/7 and a sponged layer of white polish
Hearts and Stamp: Orly Belle of the Ball
Birds: China Glaze For Audrey, white and black polishes, dot of NYC 111 for the cheeks
Bow: Sally Hansen Sun kissed
Dotting tools and nail brushes used.
The stamp I used was BM 09.
I really loved how this came out, I'm definitely going to redo this one next year.
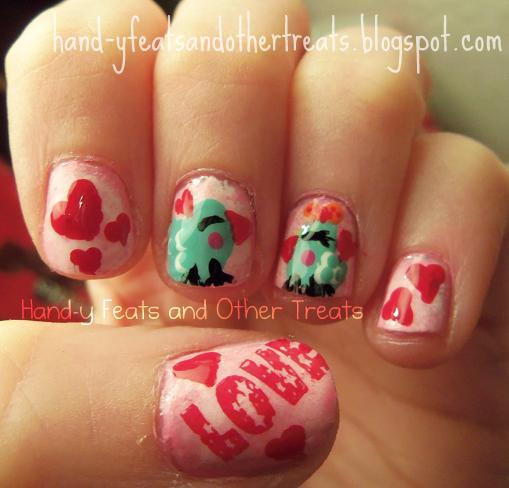
Owl You Need is Love
I had colored a few Valentines cards and among them was one that read "Owl you need is love." I thought that was the cutest pun and decided to make a design for it.

I first saw an Owl mani on letthemhavepolish and she had originally seen the tutorial from chalkboardnails and if you follow the last link, you can find the original source of the tutorial. I used the little hole puncher reinforcements as a way to do my "horns" of the owls. I also read some where...cannot for the life of me remember where, that you can also use these reinforcers to make the half moon design. If you don't know what a half moon design is or what it looks like click here.
What I used:
For all nails---
Base coat: Essie Ridge filling base coat
Top coat: Seche Vite
Dotting tools
For Owls---
Base color: Ulta Plum Perfect
Eyes: Black and white strippers
Beak: Sally Hansen Sun Kissed
Feathers: essence a lovely secret
For Other nails---
Base color: essence a lovely secret
Polka hearts: Ulta Plum Perfect
This time when I did the polka hearts I used the method described in the post here. It was so much easier and I think (for the most part) the hearts came out a lot better than in my previous polka heart post. Have you tried this polka heart technique yet? Do you want to?
I was very happy with how both of these designs came out, I'm just so sad that it took a whole month to share them with you. I hope you all enjoyed them. I have new posts in the works, so more are on the way!
Until next time!
☮Erin


