Hello all! Today I have some Halloween themed gradient nails for you. I still need practice with making gradients but I like the way this one came out. I choose to do orange to yellow with some black pumpkins, since the gradient by itself seemed a little boring.
What I used:
Base color: Sally Hansen Fashionista Orange
Gradient: Sally Hansen Sun Kissed, Fashionista Orange, Lightening
Sponge
Stamp: BM 305
Black stamping polish
I can't get over how quickly this month has been flying by! Halloween is next week! How insane!
Hello all! I have an exciting post for you today! Ashley from the blog Passion for Polish was sweet enough to write me a guest post! This was the first guest post to be featured on my blog and I think it was a lot of fun! Ashley is extremely nice and she has beautiful nails. She created a pretty design for me today, check it out!
-----------------------------------------------------------------------------------------------
Hello Hand-y Feats and Other Treats readers! When Erin asked me to do a guest post for her, I was so unbelievably excited ... and then completely terrified! Erin has such a talent for nail art, and I'm a bit nail art challenged, so it took me forever to come up with an idea. Erin specifically requested that I use some form of 3D nail art, so here's what I came up with.
The shimmery pink foil is Studio M Nail Lacquer Hot Like Lava. On my two middle fingers, I used 3 coats of OPI Alpine Snow, and stamped the flower design with Hot Like Lava and image plate BM-211. I finished it off with gold steel ball nail accents from the Born Pretty Store for the centers of the flowers.
As pretty as the steel ball nail art is, this isn't a manicure that's going to last very long. If you seal it with a good, thick layer of top coat, you can get a few days of wear out of it at most. Since they're so tiny, they won't stay put as well as something larger, like a rhinestone. But I still love them! Thanks so much to Erin for having me over to visit today!
I have never used any type of 3D nail art and I just LOVE what Ashley did with the gold steel balls! I think these nails are simply amazing! I would definitely wear them for a night out or to a wedding. Thank you Ashley for writing such a wonderful guest post! I hope you all enjoyed her post, I know I did. Make sure to check out her wonderful blog! I really enjoyed having a guest post and I hope to have more in the future. If you are interested in writing a guest post for me, I will gladly do the same for you. We can do a swap of sorts! Go ahead and email me or write me on Facebook if you are interested. :) Ashley also featured me on her blog today, you can see the post here.
Have a wonderful weekend and I will see you Monday!
Hello all! There are only two days left of the Let's Do the Time Warp Challenge. Today's challenge was to create a manicure inspired by something that never goes out of style; something that was popular then and now. What a hard objective! I seriously had tunnel vision and could only think of denim jeans. Denim has been around for quite sometime and through the decades, though the style of jeans have changed, the love for them hasn't. My mother wore bell bottoms, I wear skinny jeans. Because denim has been popular pretty much since the 1950s and is still a fashion staple today, I think denim is timeless.
What I used:
Base coat: essence Gleam in Blue
NYC Skin Tight Denim
Stamp: BM 202
Stamping polish: Sally Hansen Silver Sweep
A piece of denim
I originally just had the denim lines on the nails but I thought it would look better with a zipper stamp. This is what my nails looked like before the stamping though.
I just love how these nails came out! It was incredibly simple to do too! I would explain how I did it but I plan on creating a tutorial for it as soon as possible. What do you guys think?
So this Wednesday is Day 8 of the challenge, the final day. This challenge sure has been a blast, a blast from the past. I have really enjoyed creating designs and seeing all of the other awesome designs from the other ladies in the challenge. I have to now recreate my favorite from another challenger...this is going to be hard! I loved so many!
Hello! Well today's nails came out a little bit interesting. I don't consider myself a fashion person. In fact, all I wear are jeans and T shirts. Which means today's challenge was just that, a challenge. So I went to Vogue for some fashion advise. I ended up finding this really bizarre yet intriguing pantsuit to use for my inspiration.
Aloha! Day 14 already! Wow! Today's challenge is flowers. I was working on my other challenge, the summertime one, and it really put me into a tropical, summer mood. That mood really affected my flowers.
Hello all! I'm excited for today's challenge because my mother has an obsession with animal print. Not only is her whole living room is safari themed, it's starting to morph into the rest of her house! So who's ready to get wild?
Hello all! First off I would like to say hello to all of my new readers! Hi! I'm so excited to share my nails with you :) If you are new then I need to catch you up with what's going on here on the blog. I am currently involved in 2 nail art challenges, which is turning into 3 since I am starting this one today. Three nail art challenges! AHHH! I am crazy haha This is what happened...I created a challenge that's only once a week back in July, then I started doing the 31 day challenge, THEN I was on the lovely Neverland Nail Blog and saw that she was hosting a new challenge. Lindsey's new challenge sounded like so much fun I just couldn't pass it up. Here's the layout.
Doesn't this sound like so much fun?! I am very excited because not only is this challenge going to be fun, I could potentially win a prize! Wahoo! Lindsey is going to be posting every Monday and Wednesday. I'm thinking I will join her on those days, I just had to post today due to yesterday's traveling and pampering my injured ankle.
Day 1: I should have been born in... The idea was to pick a decade we wish we could have lived in. I choose the 1970s. This was the time of peace, love and happiness. There were go go dancers and hippies, and the beginning of disco! Though I love Disco, I choose to channel the hippy/tye dye part of the 70s. I used a sponge for my thumb and pinky. For the rest of my nails, I did water marbling. It actually came out good! I was amazed haha.
What I used:
Base color: Sally Hansen Coral Reef
Thumb and pinky:
SH Coral reef, SH Sun kissed, SH Mellow yellow
Makeup sponge
White stamping polish.
BM 322, BM 320, BM203.
Index, middle, ring fingers:
Sally Hansen Coral reef, SH Sun kissed, SH Mellow Yellow, SH Blue me Away, and essence Lime up!
Water, dixie cup, toothpick.
White stamping polish,
BM 304, BM 07, BM 205.
Various sized nail art brushes.
I think my nails came out pretty groovy man. Stay tuned for Day 2 of this challenge and Day 12 of the 31 Day Challenge tomorrow.
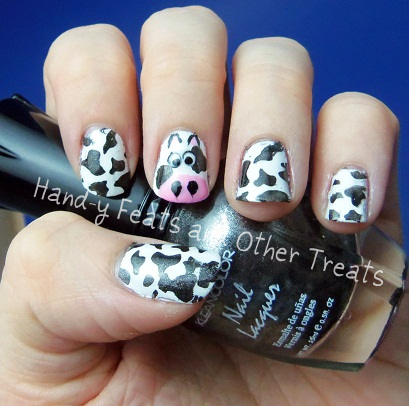
Hello! Today's challenge is black and white nails! Is it cheating if I have a dab of color? I sure hope not, I just couldn't so this manicure without a little pink! So in the great words ofBartholomew Simpson, don't have a cow, man! ;)
Hello all! Before I get started, I would like to give you all a fair warning...this post is going to be a hoot! I'm one of those people who just adore owls, so when I saw that the new Bundle Monster plate set had a couple of owl stamps, I squealed. I still can't get over how cute the owls are!
I used both the owl pattern and the itty bitty owl for this manicure. I think they came out so cute, I just wish I had a better brown polish to stamp with. Coming up with a good color combo was the hardest part about the owls. I didn't want to have white owls since they make me think of Harry Potter's owl Hedwig. I also think of snow and winter, so I was determined to have brown owls.
I found that this manicure was very hard to photograph. Most of the pictures I took came out far to shiny! The picture below is using the lighting that I usually use, my desk lamp.
This picture was taken is the kitchen. See how shiny my nails are?
This picture is outside. I was so mad because when I went to take pictures it was overcast. The weather was wonderful but I wanted sunshine. I used a laying combo for this manicure and one of the polishes I used is a Del Sol. Del Sol nail polish is awesome! It chances color when you go in the sunlight. I really want to get more of them.
I know it's hard to tell but the polish changed to a brighter pink! Cool right?
What I used:
Base color was a laying combo: 1 layer of Del Sol First Kiss, 1 layer of Maybelline Sparkling Champagne, and another layer of Del Sol First Kiss
Stamping polish: essence Date with the Night
What colors do you use for stamping? Do you just buy the special Konad stamping polishes or cheaper brands? I love black as a stamping color and white as well. I am always experimenting with my polishes to see which ones work well with stamping. I love the special stamping polishes but they can be pricey, which is why I am always on the lookout for cheaper brands that will work. If I find any great ones, I will be sure to share it with you!
I hope you enjoyed my post, have a relaxing Sunday!
Hello all! I can't believe it is Sunday already! Where has the week gone? Today is one of those lazy Sundays too. You know what goes good with a lazy Sunday? Stamping! My new Bundle Monster plates arrived the other day and I couldn't be more excited. There are 150 images to play around with; some patterns, others just cute little images. I plan to use all of them and today is the start of achieving that goal!
My new plates brought a smile to my face, so I thought it would be appropriate to begin with some smiles!
How cute is this? I just can't stop looking at my nails and smiling. BM 304 is a very cute plate and guaranteed to bring a smile to your face....and your nails.
I look forward to using the other images on this plate, it's just so cute! I originally thought about doing the smiley faces yellow but I hate how yellow tends to look against my skin tone. So the hints of yellow you are seeing is the one coat I had painted on before I switched to pink.
After painting one coat of yellow and hating it, I used one coat of hot pink. Once dry, I sponged on Orly After Party, a dark blue-ish color with itty bitty pink and purple glitter.
What I used:
1 coat Ulta Sun-sational
1 coat OPI La Paz-itively Hot
Orly After Party
Make up sponge
Konad white stamping polish, Princess
BM 304
Overall I am happy with this stamp and the color combo I used. As I mentioned before, I plan to use all 150 images included in the new Bundle Monster plates, so make sure to come back every Sunday to see some stamping!
Hello! I have yet another stamping design to show you today. I’m excited about today’s post, since this is one of those times when experimenting turns out great the first time around.
I was looking through my plates and as soon as I came across BM 21 I thought, “YES! Disco!” And when I think disco, I think disco ball! I absolutely love disco. The customs, the music, everything! One of my favorite musical groups of all time is the Bee Gees, who definitely have a disco style. Unfortunately, there only remains a Bee Gee and so this post is dedicated to him, Barry Gibb.
Usual lighting
During the duration of my polishing process, I had ‘You Should Be Dancing’ stuck in my head. I’ve loved the Bee Gees for as long as I can remember. In my opinion, they have the perfect combo of having a unique sound and being utterly corny! They also have amazing lyrics! Here's a video of the song:
I am very happy with the way this design came out. It was a pain to photograph though! This is probably the only time that I got flash to work and it payed off. You can really see the disco ball effect.
Flash
What I used:
Base coat: Essie ridge filling base coat
Base color: Sally Hansen Celeb City
Stamping color: Konad White, Princess
Stamp: BM 21
Top Coat: Seche Vite
By the way! I have a new computer, so editing and posting should be easier and therefore more frequent! I’m going to try to post at least once a week now. I change my nails once a week, so it makes sense to post a least once a week. I hope you enjoyed my post! I'm going to leave you with my favorite Bee Gees song, and a clip from the 10th Kingdom (which is one of my all time favorite movies.)
'How Deep is Your Love' is my favorite song by them. It just evokes so many emotions every time I hear it. I really love it!
Here's a clip from the 10th Kingdom of the trolls singing the Bee Gees song, 'Night Fever.' Do enjoy, this is how I sing the song too!
Hello readers! I have another stamping design for you today. Today’s post is inspired by a deck of cards! An idea thought up by my lovely best friend, Tara. I had done this design on my toes and when my best friend saw it she said, “Aw how pretty, they remind me of cards.” This girl loves her cards, so I took her word for it and decided that would be a really cute idea for a manicure. So voilà!
For my deck of cards, I used a blue design and my accent nail is of the four different suits. I originally was going to make a couple of my nails actual cards but because my nails are so small, it was turning out to be an impossible task.
What I used:
Base coat: Essie Ridge filling base coat
Base colors: Ulta Bam-blue-zled, OPI Alpine Snow
Stamping colors: NYC Skin Tight Denim, Konad Black & Ulta Non-stop Red
Stamps: BM 21, BM 19
Top coat: Seche Vite
Above is a picture of my toes! This is the design that inspired today's mani! As for the design, I really like the way my right hand came out, my left hand didn't turn out as well. In fact I had to redo my left hand several times and then just got sick of it. Would you try a deck of cards mani? What would you do differently? I hope you enjoyed my post!
Hello all! I have an interesting design for you today. Initially, today’s post was going to be about the fan brush method but it ended up evolving into something completely different. I had purchased nail art brushes from Bundle Monster, a while back, which included a couple of fan brushes. I have never used this type of brush before and thought It would be fun to give it a try. So I used two colors and dipped the end of the brush into the polishes and applied to the nail with a couple of brush strokes. I wasn’t to happy with the brush because it decided to clump instead of remaining fanned out. Perhaps I should have used acrylic paints instead of polish but hey, that’s what experimenting is for.
After the polish dried, I realized the strokes looked like feathers, so I decided to add on my feather pattern from BM 214. I choose to use a red color for the stamp because I knew it would stand out more (the whole green and red are contrasting colors thing.) Plus when I think of parrots, I see the color red.
What I used:
Base coat: Essie ridge filling base coat
Base color: Clear Polish
Polishes used for fanning: essence Lime Up! and Color Club Age of Aquarius
Fan brush
Stamp: BM 214
Stamping polish: Ulta Non-stop Red
Top Coat: Seche Vite
Have you tried the fan brush method? Would you? I plan to try this method once again but instead of using polish, I think I’m going to use acrylic paint. I hope you enjoyed my post.
Hello my lovely readers! Happy 4th of July to those of you in the States! I am proud to be an American, so to show my patriotic spirit, I have two designs for you today. I decide to do two different ones, since Blake kept saying that the blue I used for the first design looked black and not blue. I swear the boy is color blind. I hope you all enjoy my post for today.
So here is the first design that I did. I love how it came out, expect for the big stars. I need to get a better star stamp. The blue polish I used is dark but the color on the flag is a navy blue and this was the darkest blue I had. In the sunlight you could see the blue highlights of the polish better but I was unable to take photos outside.
What I used:
Base coat: Essie Ridge Filling Base Coat
Base color: essence Hard to Resist, Ulta Non-stop Red
Stamps: BM 14, BM 20
Stamping color: Konad White, Princess
Top coat: Seche Vite
As for my second design, I used a lighter blue (which made Blake happier) and the little image of stars that I had. I also slanted some of the strips to try and create a rippling effect of a moving flag. I was a little disappointed in my stamping skills here, I think the stripes look a little bit sloppy.
What I used:
Base coat: Essie Ridge Filling Base Coat
Base color: OPI Suzi says Feng Shui, Ulta Non-stop Red
Stamps: BM 14, BM 20
Stamping color: Konad white, Princess
Top coat: Seche Vite
Have you tried patriotic nails? I used the flag as my inspiration, but where do you find inspiration for patriotic nails? I think next year I am going to try to do a water marble or something with fireworks. I'm very proud of where I live and who I am, and I plain to spend the night munching away of classic American fair. I hope you all have a lovely evening. Spend it with the ones you love!


 Erin
Erin




 Erin
Erin


 Erin
Erin


 Erin
Erin


